
A drawstring bag was one of the first things I made using my mother's vintage Singer (that used to belong to my grandmother!) and fabric scraps. I think I made a little coin purse with it. Drawstring bags are super simple to sew and make for good gift bags with a personal touch. Or in a smaller size, a good coin purse.
This past week, I made a drawstring backpack for Big Sister. This is a very versatile lightweight bag. You can make this with a wide variety of fabrics, but I think thick cottons, denim or canvas works best. (Although, you cannot wash a canvas bag...)

Here's my step-by-step to make a simple drawstring backpack...
You need 2 rectangular pieces of fabric and some cord. That's it!
Once you decide on the dimensions of your bag cut out 2 pieces. I made this as an over-sized bag for a 4 year old with room to grow. The dimensions I used are 18" by 14". (My end product after seam allowance will be about 16.5" by 13".)

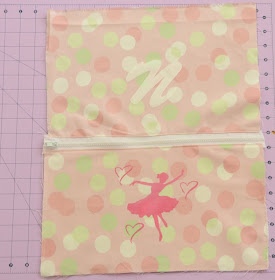
I made this bag not-so-simple by adding a zipper pouch element. But for the purpose of this tutorial I am going to keep it simple.

So you need 2 pieces of fabric 18" x 14" or whatever dimension you chose. Before you start stitching add whatever elements you want to the bag. A zipper pouch like I did, or embroidery, or stencil, or quilt 2 or more fabrics pieces to get to your desired dimension.
First, we need to hem the top sides of the bag where we are going to loop the cord. Keep the fabric wrong side facing up. Fold in the side about 1/3rd inch for about 3 inches of the length and press flat. It should look like this. Now run a straight stitch holding this fold down.

Do this for both the sides and both pieces of fabric. Now you have partially hemmed the fabric.

Fold the top of the fabric piece width wise about 1" in and press flat. Then run a straight stitch. If you use fabric that frays a lot, you might want to serge the raw edge and then stitch the fold. For a better finished look, you can also double fold the raw edge and top stitch.

You should now have 2 pieces with finished top hems like this.

Place the fabrics wrong sides facing each other and start looping your cord. You need 2 pieces of cord. The length of each piece depends on the dimension of your bag. Ideally, it is length+width times 2, plus 2 inches.
Take one piece of the cord and using a safety pin, start threading it through the front of the bag and loop it through the back of the bag so that the 2 loose ends end up on the same side. Confusing? The picture below should help.

Do the same with the other piece of the cord but start threading on the other side of the bag.

Turn the bag inside out, with the good sides facing each other. Now grab the 2 loose ends of the cord from the inside and pin it to the bottom side seam 3/4" from the bottom. Do this for both the sides.


Serge of the raw edges. A simple zig-zag stitch along the edge will do.

Turn your bag inside out and you have your finished product!

I made this a little over-sized for my daughter, because I do not want her to outgrow the bag before the fabrics lives its life. So the cord length was a little bit long for her.

I simply added a knot near the top of the bag and plan to loosen it as needed. You may also add this knot at the bottom...

Now, the little ballerina has a dance bag to store her ballet shoes and tap shoes.


This past week, I made a drawstring backpack for Big Sister. This is a very versatile lightweight bag. You can make this with a wide variety of fabrics, but I think thick cottons, denim or canvas works best. (Although, you cannot wash a canvas bag...)

Here's my step-by-step to make a simple drawstring backpack...
You need 2 rectangular pieces of fabric and some cord. That's it!
Once you decide on the dimensions of your bag cut out 2 pieces. I made this as an over-sized bag for a 4 year old with room to grow. The dimensions I used are 18" by 14". (My end product after seam allowance will be about 16.5" by 13".)

I made this bag not-so-simple by adding a zipper pouch element. But for the purpose of this tutorial I am going to keep it simple.

So you need 2 pieces of fabric 18" x 14" or whatever dimension you chose. Before you start stitching add whatever elements you want to the bag. A zipper pouch like I did, or embroidery, or stencil, or quilt 2 or more fabrics pieces to get to your desired dimension.

First, we need to hem the top sides of the bag where we are going to loop the cord. Keep the fabric wrong side facing up. Fold in the side about 1/3rd inch for about 3 inches of the length and press flat. It should look like this. Now run a straight stitch holding this fold down.

Do this for both the sides and both pieces of fabric. Now you have partially hemmed the fabric.

Fold the top of the fabric piece width wise about 1" in and press flat. Then run a straight stitch. If you use fabric that frays a lot, you might want to serge the raw edge and then stitch the fold. For a better finished look, you can also double fold the raw edge and top stitch.

You should now have 2 pieces with finished top hems like this.

Place the fabrics wrong sides facing each other and start looping your cord. You need 2 pieces of cord. The length of each piece depends on the dimension of your bag. Ideally, it is length+width times 2, plus 2 inches.
Take one piece of the cord and using a safety pin, start threading it through the front of the bag and loop it through the back of the bag so that the 2 loose ends end up on the same side. Confusing? The picture below should help.

Do the same with the other piece of the cord but start threading on the other side of the bag.

Turn the bag inside out, with the good sides facing each other. Now grab the 2 loose ends of the cord from the inside and pin it to the bottom side seam 3/4" from the bottom. Do this for both the sides.

Run a straight stitch about 1/2" from the edge (along the yellow line). Run that stitch one more time. It pays to double (or even triple) stitch it and know your bag is going to hold what you put in it. Make sure you reinforce a lot along the ends (red arrows), using reverse stitches.


Turn your bag inside out and you have your finished product!

I made this a little over-sized for my daughter, because I do not want her to outgrow the bag before the fabrics lives its life. So the cord length was a little bit long for her.

I simply added a knot near the top of the bag and plan to loosen it as needed. You may also add this knot at the bottom...

Now, the little ballerina has a dance bag to store her ballet shoes and tap shoes.


Bag looks sweet model looks sweeter! Sounds easy to do the bag.... Arj is thinking of trying it
ReplyDelete